publish your ads here for free trial


Minggu, 15 Maret 2009

Submit a Blogger Sitemap to Major Search Engines

If you haven't submitted your Blogger website and sitemap to the major search engines yet this article will help you through the process. Submitting your Blogger (Blogspot) blog to the two most popular search engines Google and Yahoo is a must if you want your site crawled and indexed quickly and, of course, to receive visitors. You may also want to cast your net a little wider. If so there are a couple of other search engines worthy of note that you may not have even considered. This article explores the steps involved in submitting your blog and sitemap to 5 major search engines: Google, Yahoo, MSN Live Search, Moreover.com and Ask.com


Submit Your Site and Sitemap to Google
For a step by step walkthrough of how to submit your Blogger blog to Google, verify your site and add a sitemap please refer to my article Submit Your Blogspot Blog Sitemap to Google

Google Webmaster Tools Index Stats Page

Submit Your Site and Sitemap to Yahoo
Yahoo has a fair share of the search engine market and therefore getting your Blogger blog crawled and indexed needs to be a priority. For an in depth discussion on how to submit your site, verify it and submit a sitemap to Yahoo Site Explorer please see my article Submit Blogspot Sitemap to Yahoo

Yahoo Site Explorer

Submit Your Site and Sitemap to MSN
You can now submit a sitemap directly to MSN at Webmaster Center. For detailed steps in submitting a Blogger site and sitemap to MSN Live Search please refer to my article Add a Blogger Sitemap to MSN Live Search

MSN Webmaster Center

Submit Your Site and Sitemap to Moreover.com
Historically submitting your Blog sitemap to Moreover.com expedited indexing in MSN because of a standing arrangement that Moreover would provide the submitted feeds to MSN for crawling and indexing. At the time of writing this article it is not clear if this is still useful as sitemaps can now be submitted to MSN directly. However, it can't do any harm so I suggest giving it a go.

To submit a sitemap to Moreover copy and paste the following line into your internet browser address taking care to replace yoursitename with the actual name of your site:

http://api.moreover.com/ping?u=http://yoursitename.blogspot.com/rss.xml

If all is well you will receive the following success message:

Moreover Sitemap Submission Success MessageSubmit Your Site and Sitemap to Ask.com
It is worth submitting your sitemap to Ask.com, previously known as Ask Jeeves. It is considered an important search engine and owns Excite, Bloglines, MyWay and iWon. Ask.com also is a participant in the Sitemaps Protocol Program.

It is easy to submit your Blogger sitemap to Ask.com. Simply copy (Ctrl + C command) and paste (Ctrl + V command) the following line into your internet browser address bar. Be sure to substitute yoursitename with the actual name of your site.

http://submissions.ask.com/ping?sitemap=http://yoursitename.blogspot.com/rss.xml

Provided there are no issues you will see the success screen:

Ask.com Sitemap Submission Success Screen

This article explored how to go about submitting your blog and sitemap to 5 major search engines: Google, Yahoo, MSN Live Search, Moreover.com and Ask.com

Related Posts
Submit Your Blogspot Blog Sitemap to Google
Submit Blogspot Sitemap to Yahoo
Add a Blogger Sitemap to MSN Live Search
10 Tips for Blogspot Bloggers on Building Site Traffic

Add a Blogger Sitemap to MSN Bing Webmaster Tools

How to add a Blogger Blog and Blogger Sitemap (Blogspot Sitemap) to Bing Webmaster Tools formerly MSN Live Search. Step by step instructions for Blogspot bloggers who want to improve search engine optimization of their blog.

Although Bing (formerly MSN Live Search) gets a fraction of search engine traffic compared to Google and Yahoo it is still worthwhile submitting your Blogger sitemap (Blogspot sitemap) and blog to Bing. The advantages of adding your blog to Bing is that you will learn more about how your site is crawled and what keywords visitors use to access your blog pages.

Updated 24 November 2010
Due to the significant changes to MSN Live Search (now Bing) and the Webmaster Center the instructions my original instructions are now out of date. I have written a completely new set of instructions (labelled new instructions) that you will find at the top of this blog post which covers how to add a Blogger Blog and Blogger Sitemap to Bing Webmaster Tools. I have chosen to leave the old instructions in place as they do explain how to add a rss feed or atom feed rather than the default posts feed if you prefer.

This Blogger tutorial covers the steps involved to add your Blogspot blog to Bing (MSN). Part One deals with how to add a site to Bing Webmaster Tools while part two takes you through the steps to add a Blogger sitemap to Bing Webmaster Tools. Both these tutorials are rated easy and can be performed by anyone using Blogger.

+++++++ NEW INSTRUCTIONS +++++++

How to Add a Blogger Blog (Blogspot Blog)to Bing Webmaster Tools

  1. Create an account or sign into Bing at MSN. If you have a hotmail account you will already have access to Bing Webmaster Tools

  2. Navigate to the Bing Webmasters Tools page


  3. Installing Skylight is purely optional. Silverlight is Microsoft's competitive product for Adobe Flash. Try it if you wish as it adds some extra functionality but for the purposes of this Blogger tutorial it is not necessary.

  4. From the Bing Webmaster home page click on Add Site

  5. Fill in the URL address of your Blogger blog eg blogknowhow.blogspot.com

    To add a Blogger blog to Bing fill in the URL address of your blog at Bing Webmaster Tools
  6. Click on Submit

  7. Your blog will now appear on the list of added sites under your Bing Webmaster account


  8. Click the Verify Site link at the right of your blog


  9. Choose Option 2 - Add meta tag to your default webpage


  10. Copy the meta tag code that appears in the dialog box by right clicking on it with your mouse and selecting copy. Keep the Bing Webmaster Tools window open as we will be returning


  11. Login to your Blogger account if not already logged in using a different browser window

  12. From the Dashboard go to Design > Edit HTML

  13. Paste the code below the <head> tag and before <b:skin> and as early as possible

    For the new generation of default Blogger templates I suggest placing the code just below these two lines:

    <head>
    <meta content='IE=EmulateIE7' http-equiv='X-UA-Compatible'/>


    For earlier generations of default Blog templates and custom templates I suggest you place the Bing Webmaster meta tag after these lines:
    <head>
    <b:include data='blog' name='all-head-content'/>

  14. Click on Save Template

  15. Return to Bing Webmaster and click on the Verify button

  16. If successful your Blogger blog will be added to the list of sites. Information about your blog will show not available as it takes at least 48 hours to activate.


  17. Click on your blog and you will be taken to the site information screen. Notice the menu (bank of tabs) for easy navigation (as pictured). Use the dropdown menu to navigate between your blogs if you add more than one to Bing Webmaster.


How to Add a Blogger Sitemap (Blogspot Sitemap) to Bing Webmaster
  1. Sign in to Bing Webmaster if not already signed in

  2. Click on your Blogger blog from the list of sites

  3. Click on the Crawl tab from the top menu

  4. Click on Sitemaps from the menu on the left hand side


  5. An Add Sitemap dialog box will pop up. Enter the following URL of the default posts feed of your Blogger blog eg

    http://yourblogname.blogspot.com/feeds/posts/default

    Replace the yourblogname with the name of your blog


  6. Click on the Submit button

  7. If you have entered the details of your sitemap correctly you will now be presented with a added sitemap success screen


In this Blogger tutorial I have taken you through the steps involved in submitting a Blogger blog (Blogspot blog) to Bing Webmaster Tools (MSN). I have also shown you how to add a Blogger sitemap to Bing Webmaster Tools by using the default Blogger posts feed.


+++++++ OLD INSTRUCTIONS BELOW THIS LINE +++++++

Steps to Add Your Blog and Sitemap to MSN Live Search

1. Login to MSN Webmaster Center with a hotmail account if you have one otherwise you will need to sign up first.

MSN Live Search Webmaster Center Home Page
2. By default you will be taken to the Site List - Webmaster Tools page.

3. Click on Add a Site and enter the URL address of your site in the box provided

4. Enter the address of your sitemap in the box provided:

http://yoursitename.blogspot.com/atom.xml

Be sure to substitute yoursitename with the actual name of your site

5. Enter your email address if you wish MSN Live Search to contact you if it encounters problems

6. Sign up for periodic news updates if you wish otherwise uncheck the box

7. Click on the Submit button

8. Next you will be taken to the Authenticate Ownership of Website Page. You will be given two authentication options choose the Meta Tag Authentication Method by highlighting the code provided and copying it using Ctrl + C. Keep this browser window open as we will come back here.

MSN Live Search Authenticate Site Page
9. In a new window of your browser login in to your Blogger blog and navigate to Layout > Edit HTML. It is a good idea to backup your template at this point in case you inadvertently overwrite some code. To backup your site Click on Download Full Template

10. Locate the <head> tag which will be about 5-10 lines from the top. You can paste the code anywhere in the head section. I suggest after this line:

<title><data:blog.pageTitle/></title>

Add MSN Live Search Authentication Code to Blogger Template
11. Save Template

12. Return to MSN Live Search Webmaster Centre and click on the Return to Site List button

13. All going well you will now be able to see your Blogger website listed in the list of your sites

MSN Site List Page for Blog Know How
14. Click on your site and you will be taken to the Site Summary - Webmaster Tools page

MSN Live Site Summary Page for Blog Know How
15. It is now a matter of waiting for MSNBot to crawl and index your site. You will need patience as this is by no means a fast process. Don't forget to sign out of MSN Webmaster Tools.


For a quicker response you can also try submiting the sitemap of your blog to Moreover.com. Historically Moreover has provided the submitted feeds to MSN for crawling and indexing. I am not entirely certain this is still in force but it is simple to do so worth a shot I say. Simply copy the code below and paste it into your browser address bar

http://api.moreover.com/ping?u=http://yoursitename.blogspot.com/rss.xml

Be sure to substitute yoursitename with the actual name of your site

If successful you will receive the following message:

Thank you for your ping. The moreover database will be updated with the new data from your url - http://yoursitename.blogspot.com/rss.xml as soon as possible


Update 24 November 2010
This ping is no longer working. I suggest you try a ping service or blog and ping tool. If you search under "ping a blog" you will find there are lots of services available.


In this tutorial we have discussed in detail how to submit your Blogger Blogspot blog to MSN Live Search, authenticate your site and add a sitemap.

Related Posts
Submit a Blogger Sitemap to Major Search Engines
10 Tips for Blogspot Bloggers for Building Site Traffic
List of Blog Know How Tutorials for Blogger Blogs

Sabtu, 14 Maret 2009

Add a Recent Comments Feed to Blogger Sidebar

When you add a recent comments widget to a Blogger blog (Blogspot blog) using your Blogger comments feed you will encourage visitors to comment on your blog and hopefully improve blog traffic blog.

It only takes a couple of minutes to add a Recent Comments widget to Blogger. It is also easy since it requires no editing of your Blogger template. This Blogger tutorial assumes limited technical knowledge of Blogger and is mostly aimed at new bloggers and beginners although it is suitable for any Blogspot blogger looking to increase action on their blog.

If you would like to add a Recent Posts Feed to your Blogger website please refer to my earlier article Add a Recent Posts Feed to a Blogger Blog (Blogspot Blog)

Below I will take you through the steps of adding a feed widget to the Blogger sidebar so that the Blogger default comments feed will be displayed there. Equally you could add this widget to the footer if you prefer.

I am going to show you two different widgets to add Recent Comments to your blog. Which you choose is up to you and largely depends on how many comments you wish to display.

Method 1 - Using the Blogger Feed Widget to
Add Recent Comments Feed to Blogger

This first method is the old way to add recent comments to Blogger using the Blogger feed widget and is still my preferred method. The limitations are though that the maximum number of comments displayed is 5.

Method 2 - Alternative Method to Add Recent Comments Feed to Blogger
There is another Blogger widget that can be added to Blogger which will display up to 10 of the most recent comments on your blog. By default it shows the author's name and this can not be removed. If you are happy with this and would like more comments displayed this is a nice widget. One problem with the widget though is it will not necessarily display in the font of your blog. You will need to check this by installing it to try it out.

Add a Recent Comments Feed to the Sidebar of a Blogger Blog

  1. Login to you Blogger blog

  2. From the Dashboard go to Design > Page Elements

  3. Click on Add a Gadget in the sidebar

  4. Select the Feed widget from the list of Basic Widgets

  5. A popup dialog box will appear requesting you to configure the URL of your feed. Enter the following text into the box labelled URL Feed substituting the URL address of your blog name eg blogknowhow.blogspot.com for yourblogname:

    http://yourblogname.blogspot.com/feeds/comments/default

    Add Site Feed Widget to Blogger Sidebar and Preview Site Feed of Recent Comments
  6. Click on continue. If you have entered the address of your comments URL feed correctly Blogger will retrieve your feed and display a preview in a dialog box. The feed will include links to the last five comments made on your blog.

    Preview of Comments Feed for Blog Know How Blogger Blog
  7. Unless you want less than 5 comments to display leave show 5 as is

  8. Under Title replace the name of your blog with Recent Comments instead

  9. If you want to be able to see the date of the comment check the Items Dates box

  10. If you want to have the comment author displayed check the Item/Sources Author

  11. Unless you are worried about visitors leaving your blog there is no real need to check Open in a New Window(note this option has been added since I first wrote this tutorial so it is not in the picture)

  12. Click on Save

  13. Click on View Blog to see your new Recent Comments feed in action.


Below you can see an example of what the recent comments widget will look like. (Naturally it will be styled to suit your blog.) You can also see it operating in the sidebar of this blog.

View of Blog Know How Site with Recent Comments Feed Widget Installed
8. If you want to change where it appears in the sidebar this can be achieved by returning to Design > Page Elements and using drag and drop to position the widget into the spot of your choice on the Blogger sidebar.

Troubleshooting
If you are using a feed delivery service like FeedBurner the default comment feed URL will be being redirected by Blogger.com. In this case you will need to enter the Feedburner address of the feed which is likely to be something like this:

http://feeds2.feedburner.com/Comments/YourSiteName

Notice how Feedburner capitalizes your blog name. Check the exact address at Feedburner if you are not sure of the feed address. For more on burning your feed at Feedburner check out these articles: Blogger RSS Feeds and Feedburner and Burn Blogger RSS Feeds at Feedburner and Add a Feedburner FeedFlare to a Blogger Feed

Method 2 - Using a Contributed Gadget to Add a Recent Comments Widget to Blogger (Blogspot)

  1. Login to you Blogger blog

  2. From the Dashboard go to Design > Page Elements

  3. Click on Add a Gadget in the sidebar

  4. Click on Most Popular from the menu on the left hand side of the Add a Gadget window

  5. Select Recent Comments

  6. Change the number of comments to display according to your individual blog requirements. The Preview box will show you what your widget will look like with less than 10 comments

  7. Change the Summary Length to 100 px or leave as is if you prefer


  8. Click on Save to activate your Blogger widget

  9. Click on View Blog to see your Recent Comments Widget displayed

  10. Use drag and drop in Design > Layout to position your widget as you desire


This Blogger tutorial has demonstrated two different methods of adding a recent comments gadget to your Blogger blog (Blogspot blog) using Blogger widgets. The recent comments widget is probably best displayed in the Blogger sidebar or it can be moved to the footer if you prefer and of course depending on your blogger template.

Related Articles
List of Blog Know How Tutorials for Blogger Blogs
Add a Recent Posts Feed to a Blogger Blog
Blogger RSS Feeds and Feedburner
Burn Blogger RSS Feeds at Feedburner
Add a Feedburner FeedFlare to a Blogger Feed

Add a Recent Posts Feed to a Blogger Blog

One very simple way to increase page views of your Blogger (Blogspot) blog is to add a recent posts feed to your site. The procedure is easy and effective and does not require any template tweaking. This tutorial assumes limited technical knowledge of Blogger and is mostly aimed at new bloggers and beginners although it is suitable for any Blogspot blogger who wants to increase site traffic.

If you would like to add a recent comments feed to your Blogger (Blogspot) blog please see my tutorial Add a Recent Comments Feed to a Blogger Blog

Below I will take you through the steps of adding a widget so that your feed is displayed in your Blogger blog's sidebar. Unfortunately the maximum number of items that can be displayed in the posts feed at this point is limited to 5 due to a Blogger limitation. I have not found a hack to increase this level but when I do I will update this post.


Add a Recent Posts Feed to the Sidebar of a Blogger Blog

1. Login to you Blogger blog and navigate to Layout > Page Elements

2. Click on Add a Gadget in the sidebar and select the Feed widget

3. A popup dialog box will appear requesting you to configure the URL of your feed. Enter the following text into the box:

http://yoursitename.blogspot.com/feeds/posts/default

Be sure to substitute yoursitename for the name of your site

Add Site Feed Widget to Blogger Sidebar and Configure Site Feed

4. If you have entered the address of your post's feed correctly Blogger will retrieve your feed and display a preview in a dialog box. The feed will include links to the last five posts on your site.

5. Delete the name of your blog and type in Recent Posts instead

Add Site Feed Widget to Blogger Sidebar and Preview Site Feed of Recent Posts
6. Click on Save

7. Click on View Blog to see your new Recent Posts feed in action.

Blogger Sidebar Widget Featuring Recent Posts Feed on the Blog Know Know website
8. If you want to change where it appears in the sidebar this can be achieved by returning to Layout > Page Elements and using the drag and drop feature to position the widget.


Troubleshooting
If you are using a feed delivery service like FeedBurner your default feed URL will be being redirected by Blogger.com. In this case you will need to enter the Feedburner address of the feed which is likely to be something like this:

http://feeds2.feedburner.com/YourSiteName

Notice how Feedburner capitalizes your blog name. Check the exact address at Feedburner if you are not sure of the feed address. For more on burning your feed at Feedburner check out these articles: Blogger RSS Feeds and Feedburner and Burn Blogger RSS Feeds at Feedburner and Add a Feedburner FeedFlare to a Blogger Feed


This tutorial demonstrates how to add a recent posts feed to your Blogger (Blogspot) blog so that it can be displayed in a widget in the sidebar of your Blogger blog.

Related Articles
Add a Recent Comments Feed to a Blogger Blog
Blogger RSS Feeds and Feedburner
Burn Blogger RSS Feeds at Feedburner
Add a Feedburner FeedFlare to a Blogger Feed

Jumat, 13 Maret 2009

10 Tips to Build Blogger Blogspot Site Traffic

This article discusses 10 easy ways Blogger (Blogspot) Bloggers can build site traffic and in many cases improve SEO - search engine optimization. By implementing these steps you will improve the likelihood of your site ranking more highly in search engine results of major search engine players Google, Yahoo and MSN and as a result increase the number of visitors accessing your site.

10 Easy SEO Tips for Blogspot Bloggers to Improve Search Engine Rankings

1. Make Your Title Tags Search Engine Friendly
One of the most important tweaks necessary for Blogspot Blogs is the adjustment of the title tags of your website because Blogger.com by default has not optimized these for search engines. To prove this point navigate to an individual post on your blog and you will see that the blogname appears first in the title bar at the top of your browser followed by the post name. As search engines place greater value on the first words of an entry this puts your site at a disadvantage in search engine results. Fortunately it is easy to reverse the blog name and the post name with a simple tweak. For instructions on how to change the order of these title tags please refer to my article entitled Adjust Blogger Title Tags to Improve SEO
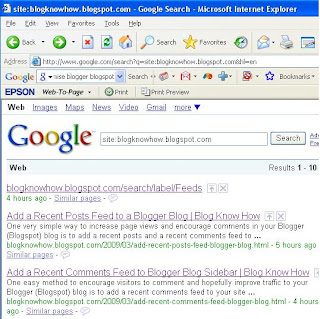
Reversed order of Blogname and Post Name Improves Search Engine Results

2. Create Search Engine Friendly Permalinks
Blogger automatically generates a permalink based on the title of your post each time you make a post. For this reason it is important to craft your title carefully. Permalinks are sometimes less than ideal especially if you have a long title. Take for example the following permalink for one of my posts:

http://blogknowhow.blogspot.com/2009/02/improved-permalinks-for-blogger-posts.html

You will see that it is search engine friendly in that in contains 2 keywords blogger and permalinks. However you may be surprised to know that How to Create Search Engine Friendly Permalinks for Blogger Posts is actually the title of this post not Improved Permalinks for Blogger Posts. I have initially used a title that is keyword rich and then after publishing gone back and entered a more descriptive title. No matter how many times I change the title the original permalink remains. If I had entered the second title straight away I may have ended up with the following permalink:

http://blogknowhow.blogspot.com/2009/02/how-to-create-search-engine-friendly.html


Not very pretty is it? And as you can see the whole point of the post is lost.

For more information on crafting permalinks please refer to my article How to Create Search Engine Friendly Permalinks for Blogger Posts


3. Add a Social Networking Button to Your Blog
By adding a Social Bookmarking button to your website you will enable visitors to your blog to create links to popular social bookmarking sites such as Google, Technorati, Facebook, MySpace, Digg, Stumble Upon, Reddit, Delicious, Furl, Yahoo etc. This means that visitors to your site will be able share these links with others thereby helping you attract more traffic to your site and encourage return visits.

Another benefit of a social bookmarking button is that you will be able to identify visitor trends and social bookmarking behaviour on your site. For more information on how to add a free Add This Social Bookmarking button to your Blogger blog please refer to my article Add a Social Bookmarking Button to Your Blog.

Add a Free Add This Social Bookmarking Button to Your Blogspot Blog

4. Submit a Sitemap of Your Blog to Popular Search Engines
If attracting traffic to your site is important to you then it is imperative that you ensure that your Blogger (Blogspot) blog is properly indexed by popular search engines such as Google, Yahoo and MSN. One way to expedite this is to submit a sitemap to each of three major search engines. Please refer to my tutorials on website submission, authenticating your site and adding your site feed to Yahoo Site Explorer, Google Webmaster Tools and MSN Tools.

Google - Submit Your Blogspot Blog Sitemap to Google

Yahoo - Submit Your Blogspot Blog to Yahoo

MSN - Submit Blogger Sitemap to MSN Live Search

Also take a look at my tutorial on submitting your blog to major search engines

5. Build Quality Links
If you want to rank highly in Google and other search engines then you need to generate quality in-bound links. That doesn't mean exchanging links with everything and everyone as I see some new webmasters do. A few quality links from authoritative sites will boost your page rankings quickly and are far superior to a bunch of links from low ranking sites.

There are several good ways to generate links to your blog. One easy way is to to submit your site to blog directories. For more information on recommended blog directories please see my article Submit Your Blogger Blog to Blog Directories. Another way to cultivate in-bound links is to submit your best articles to article directories. A third possibility is to actively participate in forums and on other related blogs where commenting affords you the option of adding a link to your site.

I would recommend linking to DMOZ (Open Directory Project). Care needs to be taken to submit your site to the correct subject area. Becoming listed can take awhile so patience is needed.


6. Write Quality Content and Post Frequently
If you have read any articles on the subject of Blogging and SEO you will no doubt have observed writers emphasising the importance of quality content. I can't stress enough how much return visits depend on providing inducements to visitors to come back. If your site content is well written and informative half the battle is won. Make sure you post frequently so that visitors can see the value of subscribing in a reader. Take some care with the presentation of your content and images as this will present a professional image. Avoid common pitfalls like bad grammar and spelling mistakes which stand out like a sore toe and detract from a visitor's overall positive experience of your site.

One leading professional blogger Yaro Starak recommends the use of pillar articles. These are articles that don't change over time and continue to attract visitors. The best pillar articles explain some concept, provide definitions, give advice or present some argument. Your site needs to have at least 5 pillar articles and more if you can manage it. Pillar articles need to be more than 500 words long, crafted to generate interest and provide a welcome resource to your visitors.

7. Ensure Your Content is Keyword Rich
Apart from the quality of your content there is the question of keyword density. The more keyword rich your posts are the greater the likelihood they will appear higher in search engine results. This means it is worth the effort of crafting your content in such a way that you make use of important keywords and keyword phrases frequently used. Don't go overboard however as Google is smart enough to recognise if your pages are littered with keywords and nothing much else. A useful free SEO tool to help you optimise your site using keywords and labels is Google Adwords. Another good tool to help you quickly craft keyword rich material is Live Keyword Analysis which assesses the keyword density of keywords and keyword phrases of any post you paste into the analysis box.

When writing posts make sure your opening sentence describes what the article is about and contains your keywords and keyword phrases. It is important that your first sentence is keyword rich as search engines like Google give more emphasis to content at the beginning of the post. Also it is worth including a short ending statement about the content of the post as there is some evidence that Google also places value on the content at the end of the post.

8. Manage Your Feeds Carefully
Feeds help your visitors find your site so they need to be managed carefully in order to make the most of them. Your site feeds are an important way to create backlinks too. Backlinks from authoritative sites are highly valuable and can boost your page ranking. For information about showing backlinks please refer to the Blogger Help Article About Backlinks

Ensure you have your RSS feed icons clearly visible for visitors to see. The most superior positioning of the feed icons on your site is in the header. Watch out for coming tutorials on how to improve positioning of RSS feed links.

You can redirect your feed to a feedburning service like Feedburner and then add a chicklet to your site (orange RSS feed button) so that the feed is instantly available on click. Please refer to my tutorials about Blogger feeds:Burn a Blogger RSS Feed at Feedburner and Blogger RSS Feeds and Feedburner. To add a FeedFlare to your burned feed check out my tutorial.

If you haven't burnt your feed you can try adding a Subscription Links widget to a sidebar too to encourage visitors to subscribe to your site in popular on-line readers such as Google Reader. You will find the Subscription Links widget available under the list of gadgets.

Blogger Subscription Links Widget installed on Blog Know How
Display your most recent posts by configuring a feed widget. Under Layout > Page Elements add a feed gadget to a sidebar. Enter the URL of the default feed of your site which will be:

http://yoursitename.blogspot.com/feeds/posts/default

Enter Recent Posts in the title and then Save. For more information about adding a posts feed widget to a sidebar please refer to my article Add a Recent Posts Feed to a Blogger Blog

You can do the same for comments if you wish to have a list of recent comments displayed in your sidebar. In this case you would enter:

http://yoursitename.blogspot.com/feeds/comments/default


For more in depth coverage about adding a comments feed to your sidebar please see my article Add a Recent Comments Feed to a Blogger Sidebar

Ensure you set up your site feeds to show the full text. To check this navigate to Settings > Site Feeds and select yes from the dropdown box for all three feeds.

Consider having a feed specifically for a popular label if it contains 20 or more posts.


9. Optimize Your Use of Images
Chances are you don't give a thought to images when you insert them into your posts but images can be optimized by careful use of filenames and the alt attribute. When naming images avoid long names. Instead give your images distinctive filenames rather than something generic like 00045.jpg which has no meaning.

The alt attribute allows you to specify what text is displayed when a visitor's mouse hovers over an image. The alt attribute also gets displayed if the image is not available for some reason. By optimizing your alt attributes you are increasing the likelihood of your images appearing in Google Image Searches.

Optimizing your alt attributes is easy. Every time you insert an image into a post look for the alt attribute which will be empty by default

style="DISPLAY: block; MARGIN: 0px auto 10px; WIDTH: 320px; CURSOR: hand; HEIGHT: 122px; TEXT-ALIGN: center" alt="" src="http://3.bp.blogspot.com/abcdeefgBxA/4560/sidebar-add-this-bookmark-button.JPG" border="0" />

Fill in the alt attribute with a useful description of your image

style="DISPLAY: block; MARGIN: 0px auto 10px; WIDTH: 320px; CURSOR: hand; HEIGHT: 122px; TEXT-ALIGN: center" alt="Blog Know How Sidebar Showing Add This Bookmark Button" src="http://3.bp.blogspot.com/abcdeefgBxA/4560/sidebar-add-this-bookmark-button.JPG" border="0" />

Depending on the subject of your site you can gain a lot of traffic from the images you post on your site. The more unique the content of your site the greater the likelihood that your traffic will stem from images. Without going overboard ensure you have a good mix of images to support your articles.


10. Take Advantage of Web Analytics Services
Having implemented some strategies to improve crawling and indexing of your site by search engine giants Google, Yahoo and MSN chances are you will want to see how these changes have impacted on the traffic reaching your site. Web Analytics programs are a valuable tool for gaining insight into visitor behaviour and trends. The kind of information that a program like Google Analytics will provide is:
how users reach and behave on your site

the most popular content on your site

the impact of optimizations you make to your site (e.g. by how much did changing the order of title tags improve traffic from search engines?)


To integrate Google Analytics into your Blogger (Blogspot) blog please refer to my articles Track Visitors to Your Blogger Blog and Add Google Analytics to Blogger Blog

This article has discussed 10 easy ways to build site traffic and improve SEO for Blogger (Blogspot) Bloggers by addressing the following areas: feeds, images, social bookmarking, title tags, permalinks, content, analytics, submitting your blog to search engines.

Related Articles
Blogger Guide to Google Adsense Placement
Avoid 6 Common Blogger Mistakes
Add Meta Tags to Blogger for Better SEO
List of Blog Know How Tutorials for Blogger Blogs

Kamis, 12 Maret 2009

Add a Horizontal Links Menu to Blogger

In this Blogger tutorial you will learn how to place a horizontal row of menu items above your first post in your Blogger blog (Blogspot blog). This process requires adding both a small amount of code to your Blogger template and a HTML/Javascript widget to your layout. This tutorial is suitable for Blogger (Blogspot) webmasters of all abilities.

Navigating a website using a horizontal menu is a traditional way to get around. On this blog for example you can see that I have tweaked Blogger to create a row of horizontal text links for easier navigation of popular pages and labels. Follow the step by step instructions below and you will be able to add a customized menu of horizontal links to your Blogspot blog as seen here.

Update Nov 14, 2010. If you are using a default template you can add a menu by using the Blogger pages feature. This tutorial shows you how to manually add a top menu and add links to it.

Steps to Add a Horizontal Links Menu Above Blog Posts

1. In Blogger navigate to Design > Edit HTML

2. Locate the header style sheet section which will usually be notated as
/* Blog Header */

If you can't find this line then locate the following area of your stylesheet using CTRL + F and place before these lines

]]></b:skin>
</head>

3. Copy and paste the following CSS code into your template under the header section taking care not to overwrite any existing code and to include the end bracket. It is probably best to paste into the bottom of the header style sheet section so that it is easier to change the code if necessary.

/* Blog Header */

#newnavbar ul li{
font-size:100%;
list-style-type: none;
display:inline;
padding:0px;
margin:10px;
border:0px solid;
}

#newnavbar li a{
color:#335577;
}

#newnavbar li a:visited {
color: #990066;
}

#newnavbar li a:hover {
color: #99FFFF;
background: #CCFFFF;
}

4. Click on Save Template

Note: You will need to change the colors to suit the color scheme of your blog. Change every instance of color and the background color to customize to your own requirements

5. Navigate to Design > Page Elements

6. Click on Add a Gadget in the Blog Posts area. If you don't have this option already set on your template you can enable it by locating the following code and setting showaddelement to yes.

<div id='main-wrapper'>
<b:section class="'main'" id="'main'" showaddelement="'yes'>

7. Select HTML/Javascript from the menu

8. Copy and Paste the following code into the Content box. There is no need to add a title. You can alter the code to suit your own needs depending on the links required.

<div id='newnavbar'>
<ul>
<a href="Home Page URL">Home</a></li>
<li><a href="URL of Your Blogger Profile Page">About Me</a></li>
<li><a href="URL of Any Label You Choose">Label of Your Choice</a></li>
</ul></div>

To add a link to a label, as I did on this site, in this case Blogger Tutorials, you would enter the following:
<a href="http://blogknowhow.blogspot.com/search/label/Blogger%20Tutorials">Blogger Tutorials</a>

9. Your script should be above your posts and any advertising or banners. If it is not drag it to the top position

Edit Blogger Layout Page Elements Blogger Posts Section
10. Click on Save

11. Click on View Blog to see your new menu in action


Steps to Add a Horizontal Link Menu to Header

If you prefer you can add your horizontal link menu to your header instead of directly above your first post. In this case follow the steps below:

1. Follow steps 1 to 4 as for menu above first post

2. Navigate to Design > Edit HTML

3. No need to check Expand Widget Templates

4. Locate the beginning of the body section which will be tagged as <body>

5. Find the line: <b:section class='header' id='header' maxwidgets='1'>

6. Change maxwidgets from 1 to 3.

Edit Blogger Template to change number of widgets in header

7. Click on Save Template

8. Navigate to Design > Page Elements

9. Click on Add a Gadget in the Header area.

10.Select HTML/Javascript from the menu

11.Copy and Paste the following code into the Content box. There is no need to add a title. You can alter the code to suit your own needs depending on the links required.

<div id='newnavbar'>
<ul>
<a href="Home Page URL">Home</a></li>
<li><a href="URL of Your Blogger Profile Page">About Me</a></li>
<li><a href="URL of Any Label You Choose">Label of Your Choice</a></li>
</ul></div>

To add a link to a label, as I did on this site, in this case Blogger Tutorials, you would enter the following:

<a href="http://blogknowhow.blogspot.com/search/label/Blogger%20Tutorials">Blogger Tutorials</a>

12. Click on Save Template

13. Click on View Blog to view the new horizontal menu in your header

Tips and Troubleshooting
To add this horizontal navigation menu to the area below the header do the following:

  1. Login in to Blogger
  2. Navigate to Design > Edit HTML
  3. Find the following lines of code:

    <div id='crosscol-wrapper' style='text-align:center'>
    <b:section class='crosscol' id='crosscol' showaddelement='no'/>
    </div>

  4. Change showaddelement to yes

    <div id='crosscol-wrapper' style='text-align:center'>
    <b:section class='crosscol' id='crosscol' showaddelement='yes'/>
    </div>

  5. To left align the menu change text-align:center to text-align:left
  6. Paste the code in step 3 of Steps to Add a Horizontal Link Menu Above First Post directly before the following:

    ]]></b:skin>
    </head>

  7. Save Template
  8. Navigate to Design > Page Elements
  9. Click on Add a Gadget in the new area enabled below header
  10. Select HTML/Javascript from the menu
  11. Copy and paste the code in step 8 of Steps to Add a Horizontal Link Menu Above First Post into the content area of the gadget and change links to your own requirements
  12. Save gadget and select View Blog to see your menu in action

This Blogger tutorial has shown you how to add a horizontal links navigation menu to a Blogger blog (Blogspot blog) either in the header itself, directly above the very first post or in the area between the header and first post. In adding a navigation menu to your blog you improve the user friendliness of your blog by helping your visitors find information and posts more readily. Any questions please don't hesitate to ask.

Related Posts
List of Blog Know How Tutorials for Blogger Blogs

Adjust Blogger Title Tags to Improve SEO

This Blogger tutorial explains how to improve search engine optimization (SEO) of your Blogger blog (Blogspot blog) by optimizing your post title tags for search engines like Google and Yahoo. How to improve search engine results by optimizing post title tags.

By default your Blogger blog (Blogspot blog) does not have search engine optimised title tags. This puts your blog at a disadvantage compared to other blogs that have inbuilt SEO or enhanced SEO modules as these sites are likely to be placed more highly in search engine results.

The title tags of your blog are ordered by blog name first followed by the title of the post. This is not ideal for popular search engines like Google and Yahoo which give more importance to the first words of a title. By way of example take a look at how the title tags of this blog were viewed in a browser before any SEO. Note the order of the tags: Blog Name | Post Name.

How Blogger Title Tags are viewed in an IE browser

When this site was first indexed by Google this is the search engine results this site received. Note how the blog name is first in all the results.

Search engine result for blogknowhow.blogspot.com before the tweak

Fortunately there is a simple tweak to your template which can rectify this problem. By simply reversing the position of the blog name and page title significant improvement can be gained in search engine results. See the difference in the example below:

How Your Blogger Title Tags are viewed in your browser with change

Follow the step by step guide below to achieve higher rankings in search engine results.

Tweak of Title Tags for New Blogger (beta) Blogs

1. Login to your blog at Blogger.com and navigate to Design > Edit HTML

2. Backup your template by downloading it to your computer. This will ensure that you can upload your template before these changes in case of problems.

3. Replace the following line of code (about 5-10 lines from the top):

<title><data:blog.pageTitle/></title>


with (highlight code, Ctrl + C to copy)

<b:if cond='data:blog.pageType == &quot;item&quot;'>
<title><data:blog.pageName/> |
<data:blog.title/></title>
<b:else/>
<title><data:blog.pageTitle/></title>
</b:if>

4. Click on Save Template and then View Blog. Navigate to an individual post. You will see that your page title is now first followed by your blog title. A pipe symbol separates the two.


Below is an example of the change in search engine results since the tweak was implemented for this site. Since optimising for search engine friendly page titles there has been a significant improvement in traffic accessing the site. This didn't happen right away but if you too implement this page title tweak and continue to deliver quality content you are on your way toward higher search engine rankings.

Blog Know How Search Engine Results in Google with Title Tags Tweaked

Troubleshooting
Several readers have reported issues with the line:

<b:if cond='data:blog.pageType == &quot;item&quot;'>


If you experience problems try inserting this line instead which works on many blogs. Ensure you have double quote marks around item followed by a single quote mark:

<b:if cond='data:blog.pageType == "item"'>


For more on this please read the comments section.

UPDATE
Due to the number of readers experiencing problems with their browsers reading this post I have created a PDF file of this article which is free to download

This Blogger tutorial (Blogspot tutorial) has discussed how to adapt the title tags of a Blogger (Blogspot) blog to improve search engine optimization (SEO) by Google,Yahoo and other search engines.

Related Articles
List of Blog Know How Tutorials for Blogger Blogs
Blogspot Blogger SEO Tips and Tricks

Popular Posts

Categories

3 column footer 4 column footer AddThis Social Bookmarking Amazon Analytics Banners and Advertising Blockquotes in Blogger Blog Directories Blogger Analytics Blogger and Facebook Blogger Comments Blogger CSS Help Blogger CSS Tutorial blogger description Blogger Feed Tips Blogger Footer Blogger Gadgets Blogger Image Border Blogger Images Blogger Meta Tags blogger meta tags tutorial Blogger Navigation Blogger Pitfalls Blogger Profile Images Blogger SEO Blogger Sitemaps Blogger Template Minima Blogger Templates Blogger Tutorials Blogging Tips and Tricks Blogspot Blogging Blogspot Meta Tags Blogspot Tutorials Borders in Blogger Buttons for Blogger Buttons for Blogger Comments Comments Counter CSS in Blogger CSS in Blogspot CSS styling CSS styling in Blogger Customise Blogger Customize Blogger Templates Customize Blogger Tips Drop Down List Drop Down Menu Drop Down Menu Widget Earn Money Online Expandable Post Summaries Expandable Posts Feeds Free Social Bookmarking Gadgets for Blogger Google Adsense Google Rankings High Paying Keywords Increasing Site Traffic Jump Breaks Keywords Make Money Make Money Adsense Make Money Blogging Make Money Online Making Money from Blogger Meta Tags Tutorial Monetize Blogger Popular Articles Posting in Blogger Posting Tips Read More Remove Navbar Search Engine Optimisation SEO SEO Tips and Tricks Sitemaps Social Bookmark Social Bookmarking Social Bookmarking Script Social Media Solutions to Common Blogger Problems Tables for Blogger Tracking Visitors Useful Blogging Tools Widgets for Blogger

Text Widget

Scroll To Top