publish your ads here for free trial


Jumat, 20 Februari 2015

How to Choose a Custom Blogger Template to Avoid Problems

So you have downloaded a custom Blogger template from the internet and now you want to customize it to the needs of your Blogger blog (Blogspot blog). Before you expend all that energy check under the hood to make sure the Blogger template isn't a lemon and that you are not going to be wasting your valuable time.

Blogger has been around for some years now and has gone through many changes. Before the most recent default templates were introduced, the choice of default templates was not that great leading many developers to crank out a heap of custom templates to meet the demand of bloggers looking for a theme that matched their blog. The problem was however, that many of these Blogger themes had missing code and many had hard coded fonts, color schemes, gadgets etc requiring coding knowledge to make alterations to the template.

Many of these custom templates are still around to download. Some are good, some not so good. Be aware if you use a custom template on your Blogger blog it will not perform as well as a default template and some may potentially have problems further down the track as Blogger introduces new features. In preference it is usually better to use a default template and customise it to your own specifications. In future posts I will talk a lot about how to go about this so watch this space.

In the meantime if you have downloaded and installed a Blogger custom template and you want to check it out before going ahead with making changes look for these three features immediately on installation of a custom template. If any are missing there are fixes available but it does mean an edit to the template code. Also bear in mind that if gadgets like these are missing the template was probably created a few years ago and it may be better to find something more recent.

  1. Check that the Blogger quick edit wrench is working. That is the crossed wrench symbol that appears next to each installed gadget in the Blogger blog sidebar, header and footer when you view your blog and are logged in. The best place to check for this on installation is in the sidebar. Each gadget will have its own wrench symbol if this feature is working properly.

    If you really like the template but this feature is not working please check out my instructions to fix this issue Fix the Missing Quick Edit Wrench in Blogger

  2. Check that the Blogger quick edit pencil is working. The quick edit pencil is the pencil that that appears beneath the post in the post footer when you are logged in and viewing your blog. It does not display in post preview mode. It must be enabled under Configure Blog Posts (Go to layout and then click on edit on the blog post gadget). If the quick edit pencil feature in Blogger isn't working once you are sure it has been enabled then try this fix

  3. Check that the Blogger default share buttons are working. These appear in the post footer at the bottom of each post. You can see these in the image above. Make sure these are enabled by going to layout and then clicking on edit blog post gadget and then ticking enable the share buttons option.


Other Blogger Custom Template Checks
Also check that slideshow or image sliders are working first before you do anything else to the template as often template creators do not give instructions about how to get these working. If you are not going to get good support from the template creator think carefully about using the template.

Another factor to keep in mind with custom templates for Blogger is that you may not be able to remove the links below the footer because of copyright reasons. Sometimes template authors put several of these at the bottom of the template which can be annoying.

In this article I have provided a few tips to help you choose a custom Blogger template and hopefully prevent you from investing time and energy in a template that has been poorly coded and may not be worth the effort to customise in the long run.

Related Articles
List of Blog Know How Tutorials for Blogger Blogs
No Quick Edit Wrench Problem in Blogger Fix
No Quick Edit Pencil Problem in Blogger Solution

Rabu, 04 Februari 2015

How to Change the Blog Description Font Color in Blogger

Those new to Blogger often ask about how to change the blog description in a Blogger blog. In today's Blogger tutorial I show you how to modify your blog description using the Template Editor to change the color of the font. If you have made changes to the background color of your header you may also want to change the font color of the blog description.

If you want to learn how to change the font style or change the look of the text please see my Blogger tutorial on how to change the font size and font style of the blog description.

How to Change the Color of the Blog Description
Before you start ensure you have blog description enabled on your Blogger blog. This tutorial assumes you have a default Blogger template installed on your blog. If you are using a custom template these instructions may or may not work depending on the coding of your custom Blogger template.
  1. Log on to Blogger and navigate to the dashboard of your blog

  2. From the left hand menu select "Template"

  3. On the Templates page under "Live On Blog" select the "Customize" Button


  4. From the left hand menu select "Advanced"


  5. Click on "Blog Description" currently the 5th item in the menu

  6. Under "Description Color" choose a color from the suggested palette or from the drop-down menu or type in the color code if you know the hexidecimal value eg #FFFFFF for white and #000000 for black.

  7. Notice that the changes you make can be seen in the live view below. When you are satisfied with the color scheme you have chosen save your changes and click View Blog. Please note that you might not able to see the changes in live view mode if you are using a custom template. In this case you will need to save the changes and then click view Blog to see the applied changes.

Related Articles
List of Blog Know How Tutorials for Blogger Blogs
How to Change the Font Size and Style of the Blog Description in Blogger

How to Change the Font of the Blog Description in the Blogger Header

In today's Blogger tutorial I show you step-by-step how to change the font style and font size of the blog description. The blog description is the tag line under the Blog Name that appears in the header section of your Blogger blog. If you do not yet have the blog description for your Blogger blog enabled follow these steps:
  1. From your Blogger dashboard select "Settings" which is located at the bottom of the left menu
  2. Then choose "Basic"
  3. Type your blog description in the description box located below the blog name. (Make sure you choose something that describes what your blog is about)
  4. Save your changes.
  5. Choose View Blog to see the blog description you added now in your blog header.

The main reason you might want to change the font of the default blog description is because the blog description in default Blogger templates is on the small side. Just by increasing it to 16px or even 20px will make a difference. Also you might want to customize the blog description to achieve a particular look. This tutorial will help you customize the blog description to your own individual requirements.

This tutorial assumes you are using a default Blogger template such as Simple or Awesome. If you are using a custom template the template code may be different, however, these instructions should still work in most cases.

Instructions to Change the Font Size and Style of the Blog Description
Unfortunately, the only modification to the blog description Blogger currently allows using the Template Designer is changes to the font color. Changes to the font style and font size of the blog description therefore require a manual insert of a little bit of CSS code into your Blogger template. Follow these steps to change the text style and size in Blogger:

  1. Log in to Blogger and go to the dashboard of your blog.

  2. From the left hand menu select "Template"

  3. On the Templates Page select "Edit HTML" under Live Blog.

  4. From the top menu select "Jump to Widget" and then "Header 1" from the drop down menu.

  5. Find this line:

    <b:widget id='Header1' locked='true' title='Your Blog Name (Header)' type='Header'>...</b:widget>

  6. Now click on the dots that appear between type='Header'> and </b:widget> to expand the section.

  7. You should now see the following code

    <b:section class='header' id='header' maxwidgets='1' showaddelement='no'> <b:widget id='Header1' locked='true' title='Your Blog Name (Header)' type='Header'>
    <b:includable id='main'>
    <b:includable id='description'>...<b:includable>
    <b:includable id='title'>
    </b:includable>
    </b:widget>
    </b:section>

  8. Click on the dots between <b:includable id='description'> and </b:includable>

  9. Now you will presented with this code:
    <b:includable id='description'>
    <div class='descriptionwrapper'>
    <p class='description'><span><data:description/></span></p> </div>

  10. Find this line:
    <p class='description'><span><data:description/></span></p>

  11. Now to change the blog description to a different font eg default to verdana change the code to the following
    <p class='description' style='font-family: verdana;'><span><data:description/></span></p>

  12. To change the blog description font style to italics change the code to the following
    <p class='description' style='font-family: verdana; font-style: italic;'><span><data:description/></span></p>

  13. To change the font style of your blog description from the default capitalized case to uppercase change the code as follows. Note for lower case use: text-transform: lowercase;
    <p class='description' style='font-family: verdana; font-style: italic; text-transform: uppercase;'><span><data:description/></span></p>

  14. To increase the size of the blog description font from 12px to 16px for example change the code to the following
    <p class='description' style='font-family: verdana; font-size: 16px;'><span><data:description/></span></p>

  15. Putting all the changes together from 11 to 14 would need the following code change
    <p class='description' style='font-family: verdana; font-style: italic; text-transform: uppercase; font-size: 16px;'><span><data:description/></span></p>


Related Articles
List of Blog Know How Tutorials for Blogger Blogs
How to Change the Blog Description Font Color in Blogger

Sabtu, 31 Januari 2015

How to Remove the Link from a Single Image in Blogger

By default Blogger creates a link to the image whenever an image is uploaded to a Blogger post. Sometimes, however, you might want to remove the link to prevent the image from being clickable. A common reason would be to safeguard your image. If you are worried about your image being copied you can prevent it from appearing full size by disabling the link.

If you just want to disable the hyperlink from a single image in Blogger try this method. I have found that it removes the link but it will not reinstate it once removed (using the toggle button) so be sure you want to remove the link before you start otherwise you will need to reinstate the link manually. I suggest you backup before you start.

This image has had the link removed

  1. Go to the Blogger Post Editor.
  2. Ensure you are in Compose mode (toggle between Compose and HTML on the top left corner under your Blog name
  3. Upload an image in Blogger or use an existing image.
  4. Highlight the image. You will see it gives you the choice of sizes, to add a caption, remove the image etc.
  5. While the image is highlighted click on Link from the menu once. This will disable the hyperlink and your image will no longer be clickable.
  6. Save your changes.
  7. Go to your live blog and try clicking on your image. Your image will no longer be clickable and you will no longer be able to see a larger view of the image.


    Related Articles
    List of Blog Know How Tutorials for Blogger Blogs
    How to Remove the Image Border in Blogger Template Simple
    How to Change or Delete Image Borders in Blogger Posts

    Jumat, 20 Januari 2012

    How to Access Old Style Templates in Blogger (Blogspot)

    "Can I still use the old default templates for my Blogger blog (Blogspot blog)?" is a frequent question I am asked on Blog Know How pretty often. Other people have asked me about the template I am using and how to get it. In answer to the first question as you can see older style templates do work on Blogger. And with respect to the second question the template I am using on Blog Know How is an enhanced version of the Rounders 3 Blogger template which is one of the older style default Blogger templates available from 2006 onwards.

    In today's Blogger tutorial I am going to show you how to access the older style default Blogger templates (Blogspot templates) and activate them on your Blogger blog. This tutorial is mostly written for those new to Blogger who might not realise that there are a number of default Blogger layouts released in 2006 that are still perfectly usuable. Also there may be some of you who would like to revert back to an older style Blogger template but are not sure how to find the old templates on Blogger.

    A Word of Warning First
    At the outset I need to say that by applying an older style Blogger template to an existing blog you may lose some of the advanced design and layout features in the Blogger Template Designer. This may not be a drawback if you are happy to do a bit of tweaking and may actually be a far better alternative than downloading a free custom Blogger template that may have a host of compatibility problems with Blogger especially if it was released a while ago. There are some pretty good free custom Blogger templates out there and there are some which were thrown together and have all sorts of problems which are not easily solvable unless you know how to code in CSS.

    So please be warned that you may potentially lose some features in converting to an older Blogger template. For instance if you are using the Simple default Blogger template and already have a three column layout selected with a 2 or 3 column footer then you will find that Blogger will revert to a two column layout and place all your widgets in the sidebar if you select an older style template. You will then need to manually add the footer and the extra sidebar. See my tutorials on how to add a 3 or 4 column footer to Blogger and how to manually add an extra column to Blogger for help with this.

    I suggest before you start that you download a full back up of your template and that you upload this to a test blog to see how it looks rather than trying it out on a live blog. However if you decide go ahead and later change your mind and want to revert back to the one of the newer Blogger templates you will need to manually shift your widgets out of the sidebar using the drag and drop feature in Page Elements

    How to Access Older Style Blogger (Blogspot) Templates

    Note: These instructions assume you are using the updated Blogger interface. If you are using the old Blogger interface (you will have a message at the top of your blog "Try the updated Blogger interface") then start at step 3.

    1. From Overview in the updated Blogger interface click on the wheel icon at the top right which will give you an array of Blogger options

    2. Select the Older Blogger Interface from the drop down menu

      Select Old Blogger Interface from Drop Down Menu in Blogger overview

    3. The older style Blogger Dashboard will now be visible and displaying a list of blogs if you have more than one otherwise just the one. Click on Design from the list of links under the blog title you wish to apply the older Blogger template to.

      Select Design in the Old Blogger interface
    4. Click on the Edit HTML link located under the Blogger tabs menu

      Select Edit HTML in Blogger

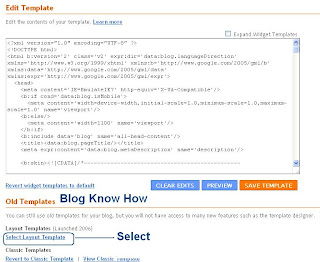
    5. Once on the Edit HTML page scroll to the bottom of the page and on the left you will see a heading entitled Old Templates. Click on the Select Layout Templates from the list. Avoid the Classic templates as these date from Blogger's first inception and are really too old to be of use.

      Select old template layout from Blogger edit HTML page

    6. You will now be on the older style Blogger templates page and can scroll through and select a template. Use the preview link to see how your blog looks with one of the older style templates applied. I use the Rounders 3 for Blog Know How by the way although I have adapted it to a 3 column layout.

      Select default Blogger template from the menu

    7. Once you are sure you want to change over to an older style template click on the save button to apply the older style default Blogger template to your Blogspot blog.

    8. Click on View Blog at the right of the menus tabs to view your changes and navigate around your blog.

    Today I have shown you how to change your Blogger blog over to one of the older style Blogger templates. Remember that in doing so you may sacrifice some of the advanced layout and design features available in Template Designer but it will give you the option of more template options and a time-saving alternative to having to download and try out heaps of free custom Blogger templates available on the internet only to find they don't work properly. And remember that even with free custom Blogger templates most do not work with Blogger Template Designer. Having to manually add a footer or an extra column to your Blogger blog are really minor changes if everything else is working fine.

    Related Articles
    List of Blog Know How Tutorials for Blogger Blogs

    Senin, 14 Februari 2011

    How to Fix Missing Quick Edit Pencil in Blogger Blogspot

    Is your custom Blogger template missing its quick edit pencil at the bottom of your Blogger posts (Blogspot posts)? Don't worry. In this Blogger tutorial I discuss how to show a quick edit pencil icon beneath Blogger posts if it is missing. This is a common Blogger problem among custom Blogger templates but fortunately it only takes a couple of minutes to fix.

    This Blogger tutorial follows on from my previous Blogspot tutorial about fixing missing Blogger icons. Check out how to show quick edit gadget wrench in Blogger (Blogspot) for help with this issue.

    In my previous Blogger tutorials I have also discussed how to fix many other common Blogger problems eg how to fix a missing embedded comment form in Blogger. Take a look at all my Blogger tutorials on how to fix common Blogger problems (Blogspot problems) here

    Fix Missing Quick Edit Pencil Blogger Blogspot
    The quick edit pencil is a nice Blogger feature that you would not want to be without. A click on this time saving Blogger icon gives you direct access to your Blogger posts without having to go through "Edit Posts"

    So if the free custom Blogger template you downloaded from the internet has no quick edit pencil displaying under your Blogger posts when viewing the actual published post then it can be fixed by taking the following the steps below:

    1. Login to Blogger

    2. Go to your Design > Page Elements

    3. Click on the Blog Posts edit button located in the bottom right hand corner of the widget


    4. A Configure Blog Posts window will pop up displaying a number of different features that can be turned on and off on your blog posts.

    5. Make sure that Show Quick Edit is checked. Tick the box and save if Show Quick Edit is not already checked


    6. Now navigate to an actual published post and check whether the quick edit pencil is now displaying in or around the footer of your blog post. Remember that you must be logged into Blogger to see the quick edit pencil - it is not displayed to your visitors

      If the pencil is there then that is the end of this Blogger tutorial. The pencil just needed to be enabled. So thank you for joining me today and if you have any other issues with Blogger be sure to check out my how to fix common problems in Blogger tutorials or take a look at the list of all the Blog Know How Blogger tutorials

      If the Blogger quick edit pencil is still missing it means that some important code has been omitted from your Blogger template and it will need to be added to get the quick edit pencil to show up

    7. Go to Design > Edit HTML

    8. Back up your template

    9. Check the Expand Widget Templates box by placing a tick in it

    10. Find the following line of code by holding down the CTRL key and F at the same time:

      <b:includable id='postQuickEdit' var='post'>


    11. Check whether the following code is under it:

      <span class='post-icons'>
      <!-- email post links -->
      <b:if cond='data:post.emailPostUrl'>
      <span class='item-action'>
      <a expr:href='data:post.emailPostUrl' expr:title='data:top.emailPostMsg'>
      <img alt='' class='icon-action' height='13' src='http://img1.blogblog.com/img/icon18_email.gif' width='18'/>
      </a>
      </span>
      </b:if>

      <!-- quickedit pencil -->
      <b:include data='post' name='postQuickEdit'/>
      </span> </div>


    12. If part or all of the code is missing copy and paste it above :

      <!-- quickedit pencil -->
      <b:include data='post' name='postQuickEdit'/>


    13. Save changes to your Blogger template

    14. Go to an individual published post page and see your new quick edit pencil displayed under your Blogger post


    Tips and Troubleshooting
    If you want to change the Blogger quick pencil icon you can by changing the image. Simply replace the image as depicted in red with the URL address of your own image. If your image is a different size you may have to change the width and height as shown in blue for the image to display correctly

    <span class='post-icons'>
    <!-- email post links -->
    <b:if cond='data:post.emailPostUrl'>
    <span class='item-action'>
    <a expr:href='data:post.emailPostUrl' expr:title='data:top.emailPostMsg'>
    <img alt='' class='icon-action' height='13' src='http://img1.blogblog.com/img/icon18_email.gif' width='18'/>
    </a>
    </span>
    </b:if>

    <!-- quickedit pencil -->
    <b:include data='post' name='postQuickEdit'/>
    </span> </div>


    In this Blogger tutorial (Blogspot tutorial) I have shown you how to fix a missing Blogger quick edit pencil that is not showing. I have demonstrated how to enable the quick edit pencil in Blogger via Page Elements and I have provided you with the missing code in the event that the quick edit pencil code is missing from your custom Blogger template.

    Please let me know if this tutorial has been useful for you by leaving your comments and opinions below.

    Related Articles
    List of Blog Know How Tutorials for Blogger Blogs
    How to Show a Quick Edit Gadget Wrench in Blogger (Blogspot)
    How to Fix a Missing Embedded Comment Form in Blogger
    How to Fix Common Problems in Blogger

    Sabtu, 12 Februari 2011

    How to Add Missing Quick Edit Wrench to Blogger

    In this Blogger tutorial (Blogspot tutorial) I show you how to add a quick edit wrench to Blogger if it is missing from a Blogger gadget. Check here to find a solution for a missing quick edit pencil not showing in Blogger

    The quick edit feature allows you to edit a Blogger gadget directly from the blog itself rather than having to go through the Design > Page Elements screens and then finding the actual widget itself before you can edit it.

    Heaps of times I have downloaded custom Blogger templates only to find that there are lots of omissions compared to a default Blogger template. If you are using a custom Blogger template with the quick edit feature missing here is a step by step guide to insert the missing quick edit feature into your Blogger template

    The quick edit can be missing from anywhere in your Blogger template. I have chosen to use the sidebar for this tutorial but the solution works wherever the quick edit feature has been removed or never inserted in the first place.

    Tutorial Difficulty rating: Easy
    Time: Less than 5 minutes
    Suitable for all levels of Blogger expertise

    How to Add the Quick Edit Wrench to a Blogger Gadget

    1. Login to Blogger

    2. Go to Design > Edit HTML

    3. Check the Expand Widget Templates box

    4. Using CTRL + F buttons together bring up the search box

    5. Enter the following search term

      </b:includable>


    6. Scroll through your Blogger template. You will see that every instance of </b:includable> is highlighted in yellow.

    7. Once you come to the sidebar widgets which is the most likely place for the quick edit to be missing from look for something like the following (this will vary from template to template). This is the start of the first sidebar if you had a template with a two column sidebar

      <b:section class='sidebar' id='sidebar1' preferred='yes'>

    8. Now look at the picture below. You can see that this is the code for a Javascript/HTML widget as shown in red


    9. Just identify the widget that has the missing quick edit feature and add the following line of code immediately before the </b:includable>

      <b:include name='quickedit'/>


    10. Use the Preview button to check your changes before committing to them

    11. Don't forget to click on Save Template

    In this Blogger tutorial (Blogspot tutorial) you have learned how to fix a missing quick edit button often missing from custom Blogger templates. No matter where the quick edit button has been omitted (sidebar, footer, header etc) it can be added in to a Blogger template very easily so that a Blogger gadget can be edited without having to go through the Blogger design screen.


    Related Articles
    List of Blog Know How Tutorials for Blogger Blogs
    How to Fix the Quick Edit Pencil when it is not Showing Up in Blogger Blogspot
    How to Fix a Missing Embedded Comment Form in Blogger
    How to Fix Common Problems in Blogger

    Popular Posts

    Categories

    3 column footer 4 column footer AddThis Social Bookmarking Amazon Analytics Banners and Advertising Blockquotes in Blogger Blog Directories Blogger Analytics Blogger and Facebook Blogger Comments Blogger CSS Help Blogger CSS Tutorial blogger description Blogger Feed Tips Blogger Footer Blogger Gadgets Blogger Image Border Blogger Images Blogger Meta Tags blogger meta tags tutorial Blogger Navigation Blogger Pitfalls Blogger Profile Images Blogger SEO Blogger Sitemaps Blogger Template Minima Blogger Templates Blogger Tutorials Blogging Tips and Tricks Blogspot Blogging Blogspot Meta Tags Blogspot Tutorials Borders in Blogger Buttons for Blogger Buttons for Blogger Comments Comments Counter CSS in Blogger CSS in Blogspot CSS styling CSS styling in Blogger Customise Blogger Customize Blogger Templates Customize Blogger Tips Drop Down List Drop Down Menu Drop Down Menu Widget Earn Money Online Expandable Post Summaries Expandable Posts Feeds Free Social Bookmarking Gadgets for Blogger Google Adsense Google Rankings High Paying Keywords Increasing Site Traffic Jump Breaks Keywords Make Money Make Money Adsense Make Money Blogging Make Money Online Making Money from Blogger Meta Tags Tutorial Monetize Blogger Popular Articles Posting in Blogger Posting Tips Read More Remove Navbar Search Engine Optimisation SEO SEO Tips and Tricks Sitemaps Social Bookmark Social Bookmarking Social Bookmarking Script Social Media Solutions to Common Blogger Problems Tables for Blogger Tracking Visitors Useful Blogging Tools Widgets for Blogger

    Text Widget

    Scroll To Top